Sunday, 9 February 2014

ATC Holder Tutorial

Hi Again Everyone! <----- Annabel :)

We've started to get some fantastic ATC's at Craft Club now and I thought you might like to make a small ATC holder to keep them safe. Here are the basics for a simple design, it can obviously be enhanced and embellished to your heart's content!
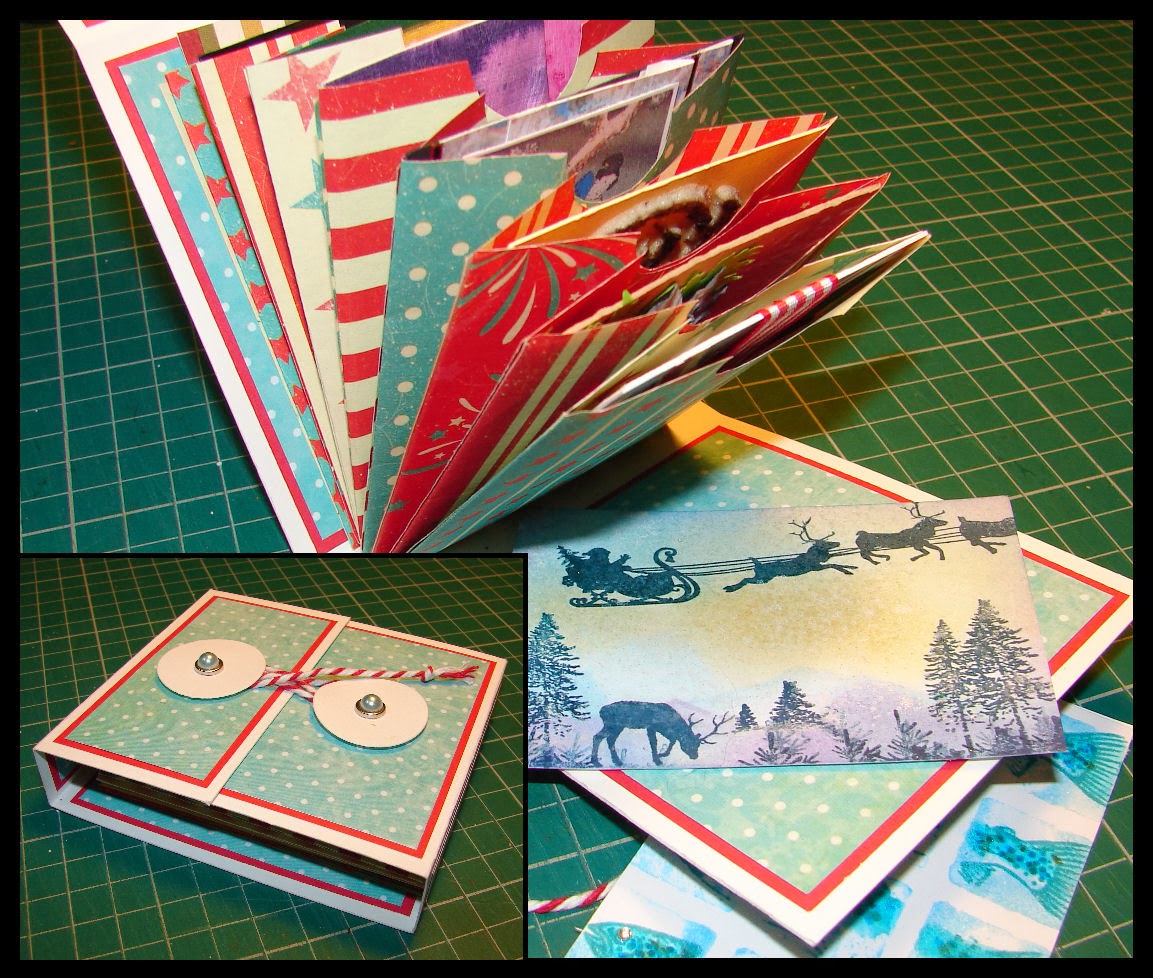


For the ATC holder I used one A4 sheet of white card, bonefolder, craft knife, scissors, 5 sheets of coloured paper, double sided tape, 2 brads, 2 die-cut circles, pokey tool, foam poking mat and baker's twine.

Blue spotty paper from "Tis the Season" collection by Bobunny. Other papers from "Stars and Stripes Collection" from Craftseller magazine. This project is an ideal way to use up some of those freebie craft papers, especially the two sided kind!


1. To start with I cut out the two main elements. The top one is to make the outer part of the holder and measures 29cm x 9 m. The bottom one is to make the individual pockets  in the holder and measures 18cm x 7cm. Score, fold and cut both as shown.


 2. Next cut out the paper needed for the matting and layering on the outer holder. As we are covering inside as well as outside you will need to make two sets. Use the dimensions shown in the picture.
(You will need 2 of 8cm x 4cm, 3 lots of 8cm x 1cm and 4 lots of 8cm x9 cm.)
When I have finished cutting the blue paper to size I mounted all the pieces on to red paper.


3. Stick your matting and layering pieces to the outside of the holder with double sided tape. (Don't do the inside yet!)
Measure to the centre point of the 5cm flap and bodge through a hole. 
Push a brad through a diecut card circle and then through the bodged hole. Secure on reverse.
Do the same with the lower flap.


4. You can now wrap some Baker's twine around/behind the circles and create a fastening to hold the folder shut. Wrapping in a figure of eight pattern looks nice! It's surprisingly secure.


5. Now open the holder and use tape to attach the remaining matted pieces. You are now covering up the messy side of the brads too. Don't attach anything to the section marked "A", leave it as it is.


 6. Now it's time to make the ATC pockets. I used double sided paper and started by cutting it into 18cm x 9 cm sections. I then used my pocket template to mark out the rest of the design. 
I cut eight pockets for this tutorial- but you can add more pockets if you want, or less, its a flexible system!
You could also cut all the pockets in card and then add decorative elements.


 7. When they are all cut out I chose the order I wanted to attach them in. Then I added double sided tape to the middle/back of each pocket. Next stack them up and stick them down as squarely as possible.


8. Add additional tape to the back pocket and then attach it to the back of the folder. If you hold it upright it's easier to align the bottom of the pockets with the bottom of the folder, so they sit on the section that we left without any matting.


Finished ATC holder! It's actually pretty robust and could be altered to fit any number of pockets. A slightly different concertina effect can be made by sticking the front pocket to the front piece of the holder, but this stops you adding more pockets at a later date. Hope you feel inspired!


Monday, 3 February 2014

Crafty Magic Blog Challenge

Hi Everyone :) <---Annabel posting!

This month we thought we would do something new on the blog and do a blog challenge!

Last time I saw Helen she gave me a redundant little owl stamp (freebie with a magazine) and I set about making a card with it!

You are welcome to join me in the challenge and borrow the stamp for something completely different or just have a go at a card? I will bring the stamp with me to the next Craft Club. There is no time limit for this.

 
                                       Blog Challenge Owl Card!

Here is a tutorial for the card I made.

For this card I used a 15cm x 15cm Kraft card blank and envelope, a 14cm x 14cm piece of white linen card, Distress inks, black Impress dye ink, acrylic stamping block, water pen, Cuttlebug and dies, foam pads, round corner scissors, paper straws, gardening twine and ribbon, Glossy Accents, Yellow Stickles, Heart Pearl Pins and scraps of white and brown paper.

 1. On the14cm x 14cm White Square stamp the owl image randomly all over using three different shades of Distress Inks. (I used spiced marmalade, tea dye and brushed corduroy - though any three colours will be fine!)
2. Using the watercolouring with Distress Inks technique, add some extra colour to the stamped images. I use my acrylic block to squidge out some distress ink and then use it like paint with a waterbrush. (Some water and a normal brush would work just as well.)
3. When the inks were dry I used my "corner" scissors to shape the stamped card and the Kraft card blank I was adding it to. I cut the bottom two corners off making it a tent fold card. Do not stick it down yet.
4. I stamped another little owl onto some smooth white card using Impress black ink and then coloured it using the watercolour technique with distress inks. This is using the same three shades as before with some extra "ripe persimmon" distress ink to make it a bit brighter.

5. When the ink was dry I used the Cuttlebug to cut it out using a circle die, and then cut a co-ordinating scallop circle from some brownish scrap paper. Stick the two together.
6. Before sticking on to the card base I wrapped some flattened drinking straws and some hemp style twine approx two thirds of the way down the backing paper. I used sellotape to attach them to the back of the paper and to get as flat a result as possible. Stick down the backing paper to the card base and use 3D foam tabs to add on the scallop/circle topper.
7. When the card was assembled I added some Glossy Accents to the owl's eyes and some yellow Stickles to some of their bellies. I also glued in two pearl heart pins. Then left it for an hour to dry - why does Glossy Accents take soooo long to dry?:)
8. The Final Card! - and also another I made using a different set of Distress Inks and some vintage ribbon. The owl is also stamped on the Kraft envelope to give a co-ordinated look. I printed out an owly insert for inside too.

Hope you feel inspired to make something yourself :)

Saturday, 11 January 2014

Water colouring with distress inks

I've been trying out water colouring with distress inks recently and have been very pleased with the results. You can make them pale as with traditional water colour or more intense which I preferred for the projects I was working on.


The above used a Sheena Douglass stamp set from her A little bit magical range. I blended distress inks for the background and then stamped the individual images to make the scene. Each was then painted using water and distress inks. I put the pad of distress ink onto my glass cutting mat and then used a fine brush with water to pick up the ink and colour onto the non pearly side of Centura Pearl card stock.
I stamped the brick wall on the right, toadstools and leaves individually and painted them in the same way to then decoupage onto the front of the scene.

The ones above were done using the same painting method and Hobby Art scene it stamps sets to create the scene with the individual stamps.
Hope you like them. I really enjoyed painting them nice and easy and quick. Helen x

Thursday, 31 October 2013

Christmas wreaths

Hi everyone

Thought I would share with you the Christmas Wreaths I made today. Used a Tando Creative kit so you get all the blank pieces then play with them however you wish. For the both I painted with Pebeo acrylic paints. Then used the Paint Fusion technique fro the holly leaves. On the traditional one inked around the edges of the stars with Spiced Marmalade and Walnut Stain Ink. On the other I painted and glittered them. All the baubles were painted and then stamped with the Indigo Blu bauble stamp and gilded with silver and gold gilding flakes.
Lovely and simple project and quick to do.
Hope you like them. 
Please feel free to comment on this and my previous Blog.
Helen 

Thursday, 24 October 2013

Box Cards

Here goes my first Blog post.!!!
I thought I would share with you my boxed cards. Made using Chloe's Creative Cards ready to assemble box cards. They come in a pack of 8. 4 8 X 8 and 4 A5 size. Ready scored you just assemble and add your own embellishments.  I've made three so far. 

This is the first using some of my favourite Indigo Blu stamps for the stags, trees, santa (inside) and snowflake border and a Stamps Away stamp for the village scene, The front images were all stamped with blue memento ink and embossed using clear embossing powder. 

The baubles, snowflakes and foliage are made using Spellbinders and Marianne die cuts. I made the background using a Clarity stamp mask and the same blue ink and stamped the stags, trees, santa and message. The bauble inside actual hangs and dangles in front of the scene.


For this one I used a Crafter's Companion Desire embossing folder to create the embossed background inside and outside the card. The sentiment is a Hunkydory one from last year (at least I've used it now!!) matted and layered with gold mirror card and another bit more embossed card.
 

The inside was made using Spellbinders die cut for the tree, bauble and corners and embellished with pearls. The Chloe large flower stamp I embossed in gold and white on white vellum and white card and cut them out to make the poinsettia's.

Finally, if you haven't drifted off. This is the A5 size and I used the Katy Sue designs Winter theatre card CD for the images inside and out. Together with a memory box border die for the front foliage and die cut the front owl images with a Spellbinders scalloped circle die.Of course I used a few pearls.

I used the same Memory box foliage die inside but chopped it up a bit together with a Spellbinders 'delites' die for the flowers and stuck these around the edges. The background and decoupaged owl image is all from the CD.

Hope you like them.   
Helen x